

How To Set Up A Pa System
Hither'southward an example of a PA system for band consisting of drums, bass, two electric guitars, a keyboard, and vocals.
This time, we'll use a 32-channel analog mixer MGP32X, powered speakers DXR12mkII and DXS18 for main speakers and subwoofers and DXR12mkII for monitor speakers.
ane. Mixer, Master speaker placement and Connections
The placement of the MGP32X mixer and main powered speakers DXR12mkII and DXS18 every bit well as their connections is as follows:
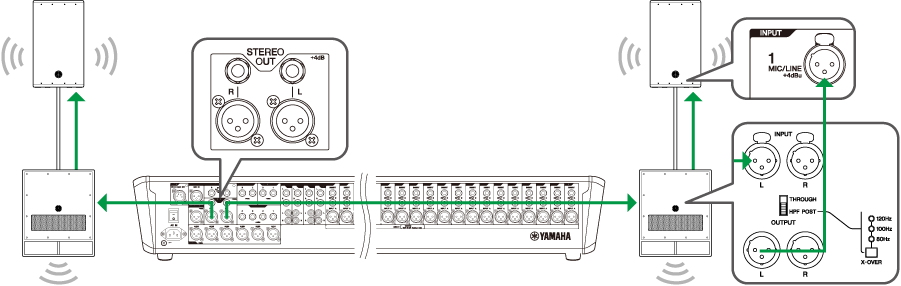
(ane) Outset, identify the mixer. Ordinarily, the platonic position is in the eye of the audience, where sound can best be heard. Try to detect the position that is best depending on the situation. Place the mixer on a desk or a table, so it is easy to operate.
(two) Place the speakers to the left and right of the forepart-most part of the stage, so that they do not interfere with the microphones and create acoustic feedback. Put the sub woofers on the floor or on the stage, and mount the DXR12mkII speakers on a tripod or pole then the bottom of the speaker is level with the audition caput hight.
(3) Gear up the power for mixer and powered speakers. Don't turn the ability on, since all connections take not nevertheless been fabricated.
(4) Connect INPUT of the powered speakers to STEREO OUT of the mixer with XLR cables.
(5) Connect OUTPUT of the DXS18 and INPUT of the DXR12mkII with XLR cablevision. And then, make sure to fix the THROUGH/HPF Mail service switch to HPF Post and select the crossover frequency using the X-OVER switch.
2. Next, fix the monitor speakers for the performers on stage
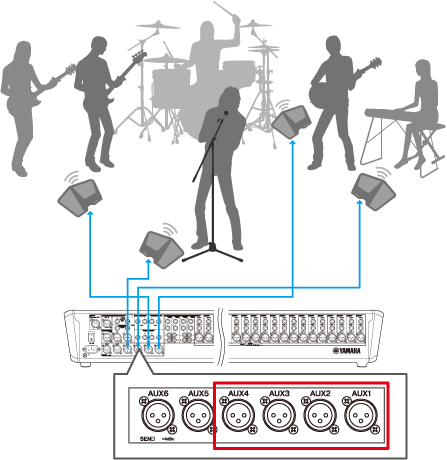
- Monitor breakdown
When using the AUX channels, the mixer'southward input signals can be sent to the monitor speakers, using a dissimilar balance of sound for each. The monitor sound is sent through each AUX channel to the performers as follows:
AUX1: Sends audio to pulsate monitor
AUX2: Sends audio to bass guitar and electric guitar 1 monitor
AUX3: Sends sound to keyboard and electric guitar ii monitor
AUX4: Sends audio to vocal monitor
(1) Place a DXR12mkII monitor speaker at each performer's position. Pay attention to the placement of the bankroll vocal microphones to forbid feedback.
(2) Plug in the ability supplies of the powered speakers used for monitoring. Since all connections have non even so been made, do not turn the power on still.
(iii) Connect the AUX outputs from the MGP32X mixer to the speakers using XLR cables.
Note: When connecting multiple microphones and instruments, you can proceed your connections groovy by using a snake (multicore cable) that combines the cables in a single jacket.
* MGP32X is equipped with 16 COMP control knobs for channels 9-24
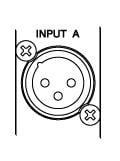
- Dynamic microphone: connect the microphone to the mixer input via an XLR cablevision.

- Condenser microphone: as with the dynamic microphone, connect the microphone to the mixer input, and then plough on the phantom power.
-Bass guitar DI: connect the electric bass to the DI with a telephone connector, and connect the DI output to the mixer input using an XLR cable. Too, connect the AMP connector from the DI to the bass amplifier, and then that sound also comes out of the bass amplifier. When using an active type DI (1 which requires a ability supply) and batteries are non used, y'all will demand to use phantom ability. Turn the phantom power on in the same way every bit with the condenser microphone.

<Notation> A DI is a "Direct Injection" box, which converts high impedance to low impedance and unbalanced signals to balanced signals which are more suitable for travelling through long cables to the mixer. Some DI boxes are passive, while others are agile (meaning they need power either from a battery or from the mixer's phantom power supply).

<Keyboard> every bit keyboards feature a stereo output, connect the keyboard using phone connectors to stereo channel 25/26. You lot may hear less racket by connecting the keyboard using a DI instead.
4. Microphone setting
- Gear up microphone stands at each vocal microphone position, and place the microphones.
- For the electric guitars, fix microphone stands facing the speakers of each amplifier and place the microphones.
- For the drums, prepare up microphone stands at each part of the gear up (kick, snare, hi-chapeau, toms, overhead) and place the microphones. Take care to avoid placing these microphones where the drummer might accidentally hit them.
5. Plough the power on
(1) Set the mixer's GAIN, faders, and the book of the powered speakers to minimum level.
(2) When turning the power on, first turn the mixer power on, then the powered speakers, in guild to avert unexpected noise. Note: When turning the power off, first turn the powered speakers off and then the mixer.
6. Checking the sound input and output
Hither, we will give an instance for a unmarried song channel.
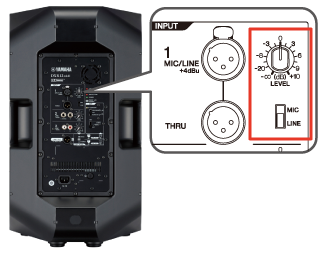
Adjust the level of the principal powered speakers. Ready the DXR12mkII MIC/LINE input switch to "LINE." Set LEVEL to 12 o'clock position.
Note: This is a temporary volume setting for the powered speakers. Readjust the book later equally needed to a suitable level.
Adjacent, fix the mixer settings.
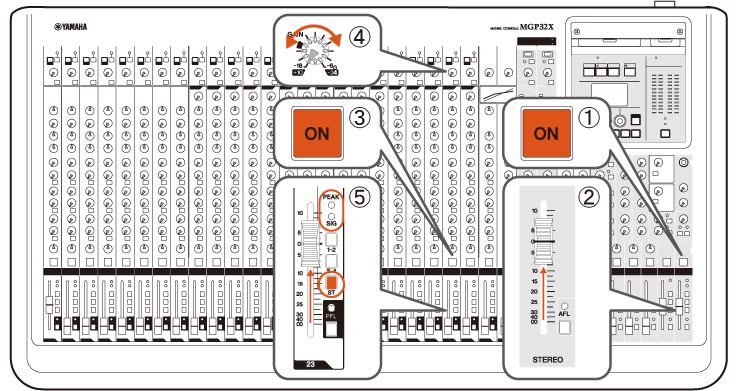
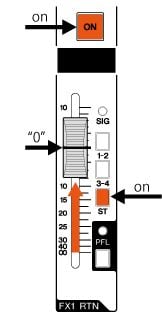
(1) Turn on the STEREO (master) channel switch.
(2) Raise the STEREO (master) fader to "0".
(iii) Plow on the ON switch for aqueduct 23.
(four) Plough the GAIN knob to conform the volume upwardly to the appropriate amount, until the SIG (indicate) lamp adjacent to the fader lights up. Adjust the Gain then that the Elevation indicator does not lite up even if the vocalizer sings at total volume or the musicians play loudly.
Note: The PEAK indicator will light up if the maximum input of the mixer is exceeded, and the audio will become distorted. To get a well-balanced mix, prepare the Proceeds so the input is just below the indicate where it starts to distort.
Note: Since the output levels of electrical and electronic instruments such as keyboards can be high, the input level when the signal comes into the mixer may already exceed the maximum level. In this example, push the PAD switch to bring the input levels down, and and then adjust the Gain.
(five) Turn on the ST (stereo) switch of aqueduct 23, and check for sound by gradually bringing the fader up to around the "0" mark.
Repeat steps (3) to (5) with the other channels every bit well, adjusting the input volumes for each channel. The next task is to arrange the overall sound levels while the musicians are playing.
7. Mixing the volume and adjusting the pan
When the levels for each channel have been properly gear up, have the musicians play a song, and accommodate the volume using the faders then that the music sounds well-balanced. The key to mixing is to make inputs that are lower in volume (such as vocals) easier to hear.
Pay particular attention to the balance between the vocals and those instruments that are loud on stage (such every bit live drums, electric guitar or bass guitars connected to an amplifier) when mixing.
Likewise, accommodate the positioning (left-right balance) of the sounds using the PAN controls.
Panning instruments with lower tones (such as kick drums or bass guitars), and vocals (which normally play the prominent role in the song) to the center balances the music, making information technology easier to listen to.
In this example, the keyboard is connected to a stereo channel. Usually, PAN on stereo channels functions as BAL (balance pan). Putting the knob in the center position will distribute the sound between left and right. Operate this knob to accommodate the left-correct balance when yous hear a difference betwixt the left and correct volumes.
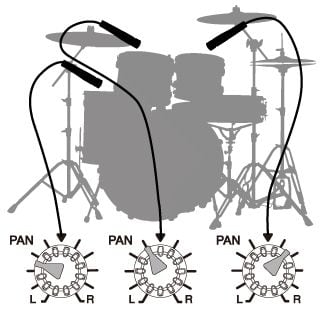
When doing a fill-in using tom-toms, the tom-toms tin can exist panned from right to centre and and so to left, so that doing a continuous fill-in will make the sound seem to pass in front end of your face.
If there are several guitars or other instruments, attempt panning each 1 to a slightly unlike position, matching their physical location on the stage.
8. Using the group function
MGP32X is equipped with 4 GROUP busses. These "groups" tin be used for various purposes. In mixing, they are useful for collecting multiple aqueduct signals earlier outputting them to the master.
For example, in that location are a full of viii drum channels. When raising and lowering the overall drum volume, all viii faders must be moved simultaneously. All the same, if the group part is used, this tin exist accomplished by using only 2 faders.
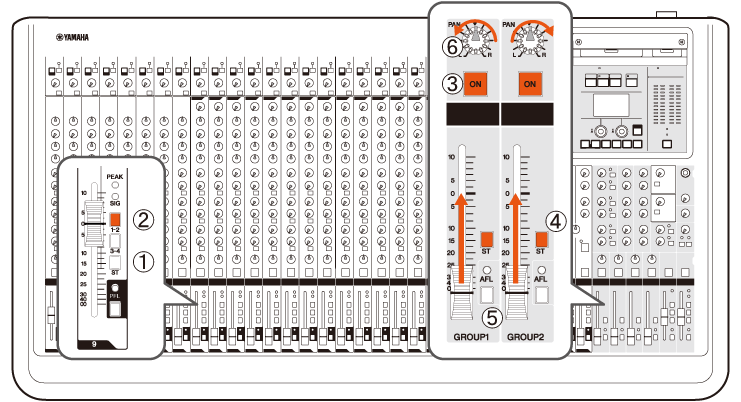
(1) Turn the ST assign switches off for the drum channels.
(2) Turn the drum channels' switches for groups 1-2 on.
(3) Plow the GROUP1 and GROUP2 masters on.
(4) Turn the ST assign switches on for GROUP1 and ii.
(v) Raise the GROUP1 and 2 faders to "0".
(6) In club to keep the stereo PAN positions ready for each input aqueduct, set PAN all the way to the left for GROUP1, and all the manner right for GROUP2.
Now the overall drum volume can be adjusted quickly using the GROUP1 and GROUP2 main faders.
9. How to apply the equalizer
Different instruments are focussed in different frequency ranges. For example, amplifying the middle range of an instrument that specializes in mid-high tones, such as vocals, will increment its clarity. However, if the low range is raised, it will cover the sounds of the depression-toned instruments such as the bass drum or bass guitar, and the clarity will exist lost. If the low range is so reduced, it will no longer cover the sounds of the low-toned instruments, and the sound will open upward more easily overall. By amplifying the specific registers of each instrument in this fashion and attenuating unneeded ranges, the registers or ranges of each instrument can exist isolated from one another, resulting in a mix with a skillful remainder. As a general practice, it is better to cut than to boost to get the best live sound.
Next, the furnishings of boosting and cutting at each frequency ring are shown below.
10. Adjusting acoustic pressure using a compressor
When mixing, you may feel that somehow your mix sounds different from that of a professional. Professionally mixed audio might be more than powerful, with a tighter feeling. Ane of the reasons for this deviation is the pinch tool that professionals use during sound production. Compressors can role every bit a limiter that keeps signals from getting also loud, but they can also shape the loudness of sounds. This can issue in an increased acoustic pressure level and brings out a sense of aggression. Nonetheless, it is necessary to adjust multiple parameters together (such as ratio and assail) when actually operating a compressor, and, if the operator is not familiar with it, information technology could cause the sound to feel squashed, with no sense of presence.
MGP32X is equipped with ane-knob compressors that are designed then that fifty-fifty someone who is non accustomed to using a compressor tin automatically arrange parameters to an advisable level by simply turning the knob. Try applying the compressor to the kick and snare drums. Applying the compressor to the electric bass or electric guitar can also meliorate their sound.
When turning the i-knob compressor clockwise, the sound level will increase. Exist careful that applying as well much compression could cause acoustic feedback. Bring the channel fader downwardly a little to compensate, if necessary.
11. Enhancing the acoustic field using reverberation
Using reverberation produces a sense of presence for sound. In particular, applying reverberation to vocals tin can give a cute or purple feeling to the song. MGP32X includes two high-grade processor systems, FX1 and FX2, that allow for the application of loftier-quality reverberation without any external equipment. The following instance will use but FX1, but it is possible to utilise both processor systems to create a sound which is overflowing with presence by using dissimilar reverberation programs for vocals and drums.
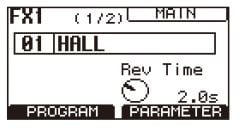
(i) Assign HALL to FX1 in the display section. HALL is a typical form of reverberation. However, PLATE, which is a smoothen form of reverberation, may also exist used for vocals.
(2) Plow on FX1 RTN (which adjusts reverberation return level), plow on the ST switch in gild to send the signal to the stereo output, and set the fader to 0.
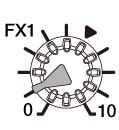
(3) To apply reverberation to a channel, in this instance it is a vocal channel, turn the FX1 knob of the channel clockwise.
Be conscientious with reverberation. If too much is applied, the sound may loose clarity, or its profile may get indistinct
Afterward confirming that audio is output from each instrument, take the whole ring play and adapt the volume of each musical instrument. Next, adjust the volume level of the powered speakers to match the required sound force per unit area level in the venue. Take care not to make information technology besides loud, to avoid any damage to hearing, and to avoid reaching the amplifier'due south limits (which may cause the sound to distort or heavilly compress). After that, the monitors which are used by the performers to mind on stage should be adjusted.
12. Adjusting the monitor speakers
Transport a monitor signal and then that each performer tin clearly hear his or her own sound also as the sounds of other performers around them. Once over again, bank check the placement and connections of the monitors (The speaker should not be straight aimed towards the front of a microphone for example). Since our system uses DXR12mkII speakers, we will switch the D-Contour switch to "MONITOR" on each speaker to optimize the frequency response for employ as a floor monitor.
- Monitor breakdown
AUX1: Sends audio to drum monitor
AUX2: Sends audio to bass guitar and electric guitar i monitor
AUX3: Sends sound to keyboard and electric guitar 2 monitor
AUX4: Sends audio to vocal monitor
How monitor signals are sent
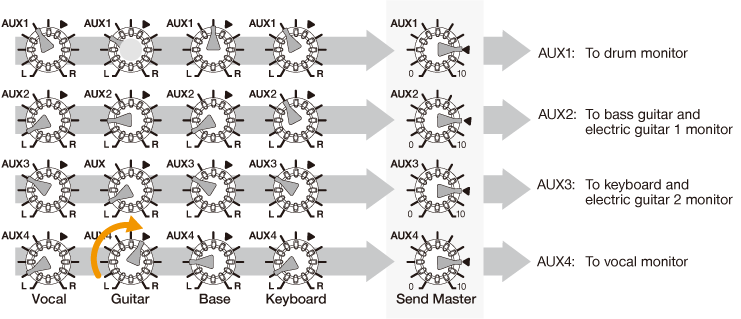
The human relationship between each AUX aqueduct for monitors and the SEND MASTER are as shown.
The book which is sent to SEND MASTER AUX1 is adapted by the knob of AUX1 for each input channel, located in the same row.
For example, if the vocalist who uses the monitor speaker attached to AUX4, wants a louder guitar sound, turn the book knob of AUX4 on the guitar channel clockwise to raise the guitar sound. And control the send volume to the vocalist'south monitor speaker with Transport MASTER AUX4 knob.
Moreover, when headphones are continued to mixer, the sound of each monitor speaker can be checked with headphones by using the AFL buttons.
In summary, the two points to consider are:
-Which input (the aqueduct where the musical instrument or vocal is connected )
-Which AUX send the monitor speaker is attached to
In that location are Aux Ship master controls in the output section of the MGP32X.
With this, basic preparations are completed. Try actually outputting sound, then confirm the audio residue on stage and at various audition seats.
Source: https://my.yamaha.com/en/products/contents/proaudio/musicianspa/setting/band_pa.html
0 Response to "How To Set Up A Pa System"
Post a Comment